Samsung stacking kit SKK-UU: my suboptimal experience and why I won’t buy from Samsung directly again.

This is about using a stacking kit to mount a Samsung dryer on top of a Samsung washing machine. SKK-UUW (white) SKK-UUB (black)

TL,DR: 1)Samsung documentation is pretty poor. Enclosed instructions are not specifically for SKK-UU. 2)Use the SKK-UR brackets and the existing bolt on the washing machine. File the screw slot in the bracket larger. 3.) When its time to insert the screw for the foot brackets at the front – choose the right driving bit for the screw and drive it home with a power drill and hope you don’t break anything. 4) Samsung support for their products bought from them directly is very poor. Buy from a local dealer who can help if you have issues.

The stacking kit is the correct one for my models of washer/dryer as confirmed by their website (and Samsung customer service.) I bought the washer/dryer from a local stockist and the stacking kit from Samsung directly via their website (was going to be faster than waiting for the local supplier to order it in)

The enclosed 4 page instruction leaflet has a 14 line safety blurb repeated in 33 languages that uses up 2 and a half pages. The remainder is pictures only. I don’t mind this as long as the pictures are helpful which they are – but they are incomplete for all the variations.

The kit comes with 3 different sets of brackets for mounting the stacking spacer/drawer onto the washer. (Washer at the bottom always. )

Brackets are for kit SKK-DF, SKK-DH and SKK-UR. No mention at all of SKK-UU.

The washer models (WW12T*****) listed under SKK-UR match my washer so I used those brackets. They look correct and position the spacer/drawer in the correct position.

What they don’t tell you (but I saw this on other youtube videos for other Samsung stacking kits) is that you need to use the existing bolt that is currently in the machine at back, at the the top left and top right corners: remove the bolt, place bracket, replace screw.

First problem: the bracket steel for the SKK-UR brackets is much thicker than the other two and and the slot/hole for the screw is just too small such that you can’t get the screw through without damaging the screw thread. Solution: I filed the slot a fraction of a millimetre bigger. Screws in easy then.

Next up, two m4x12 screws per side in each bracket to fix them to the frame. Kicking goals now.

Unscrewing the feet on the dryer to lift them to the appropriate height : You need a vise-grip or suitably large sized spanner/shifter to loosen them. Very difficult by hand at least on the model I received.

Lift dryer and position as appropriate.

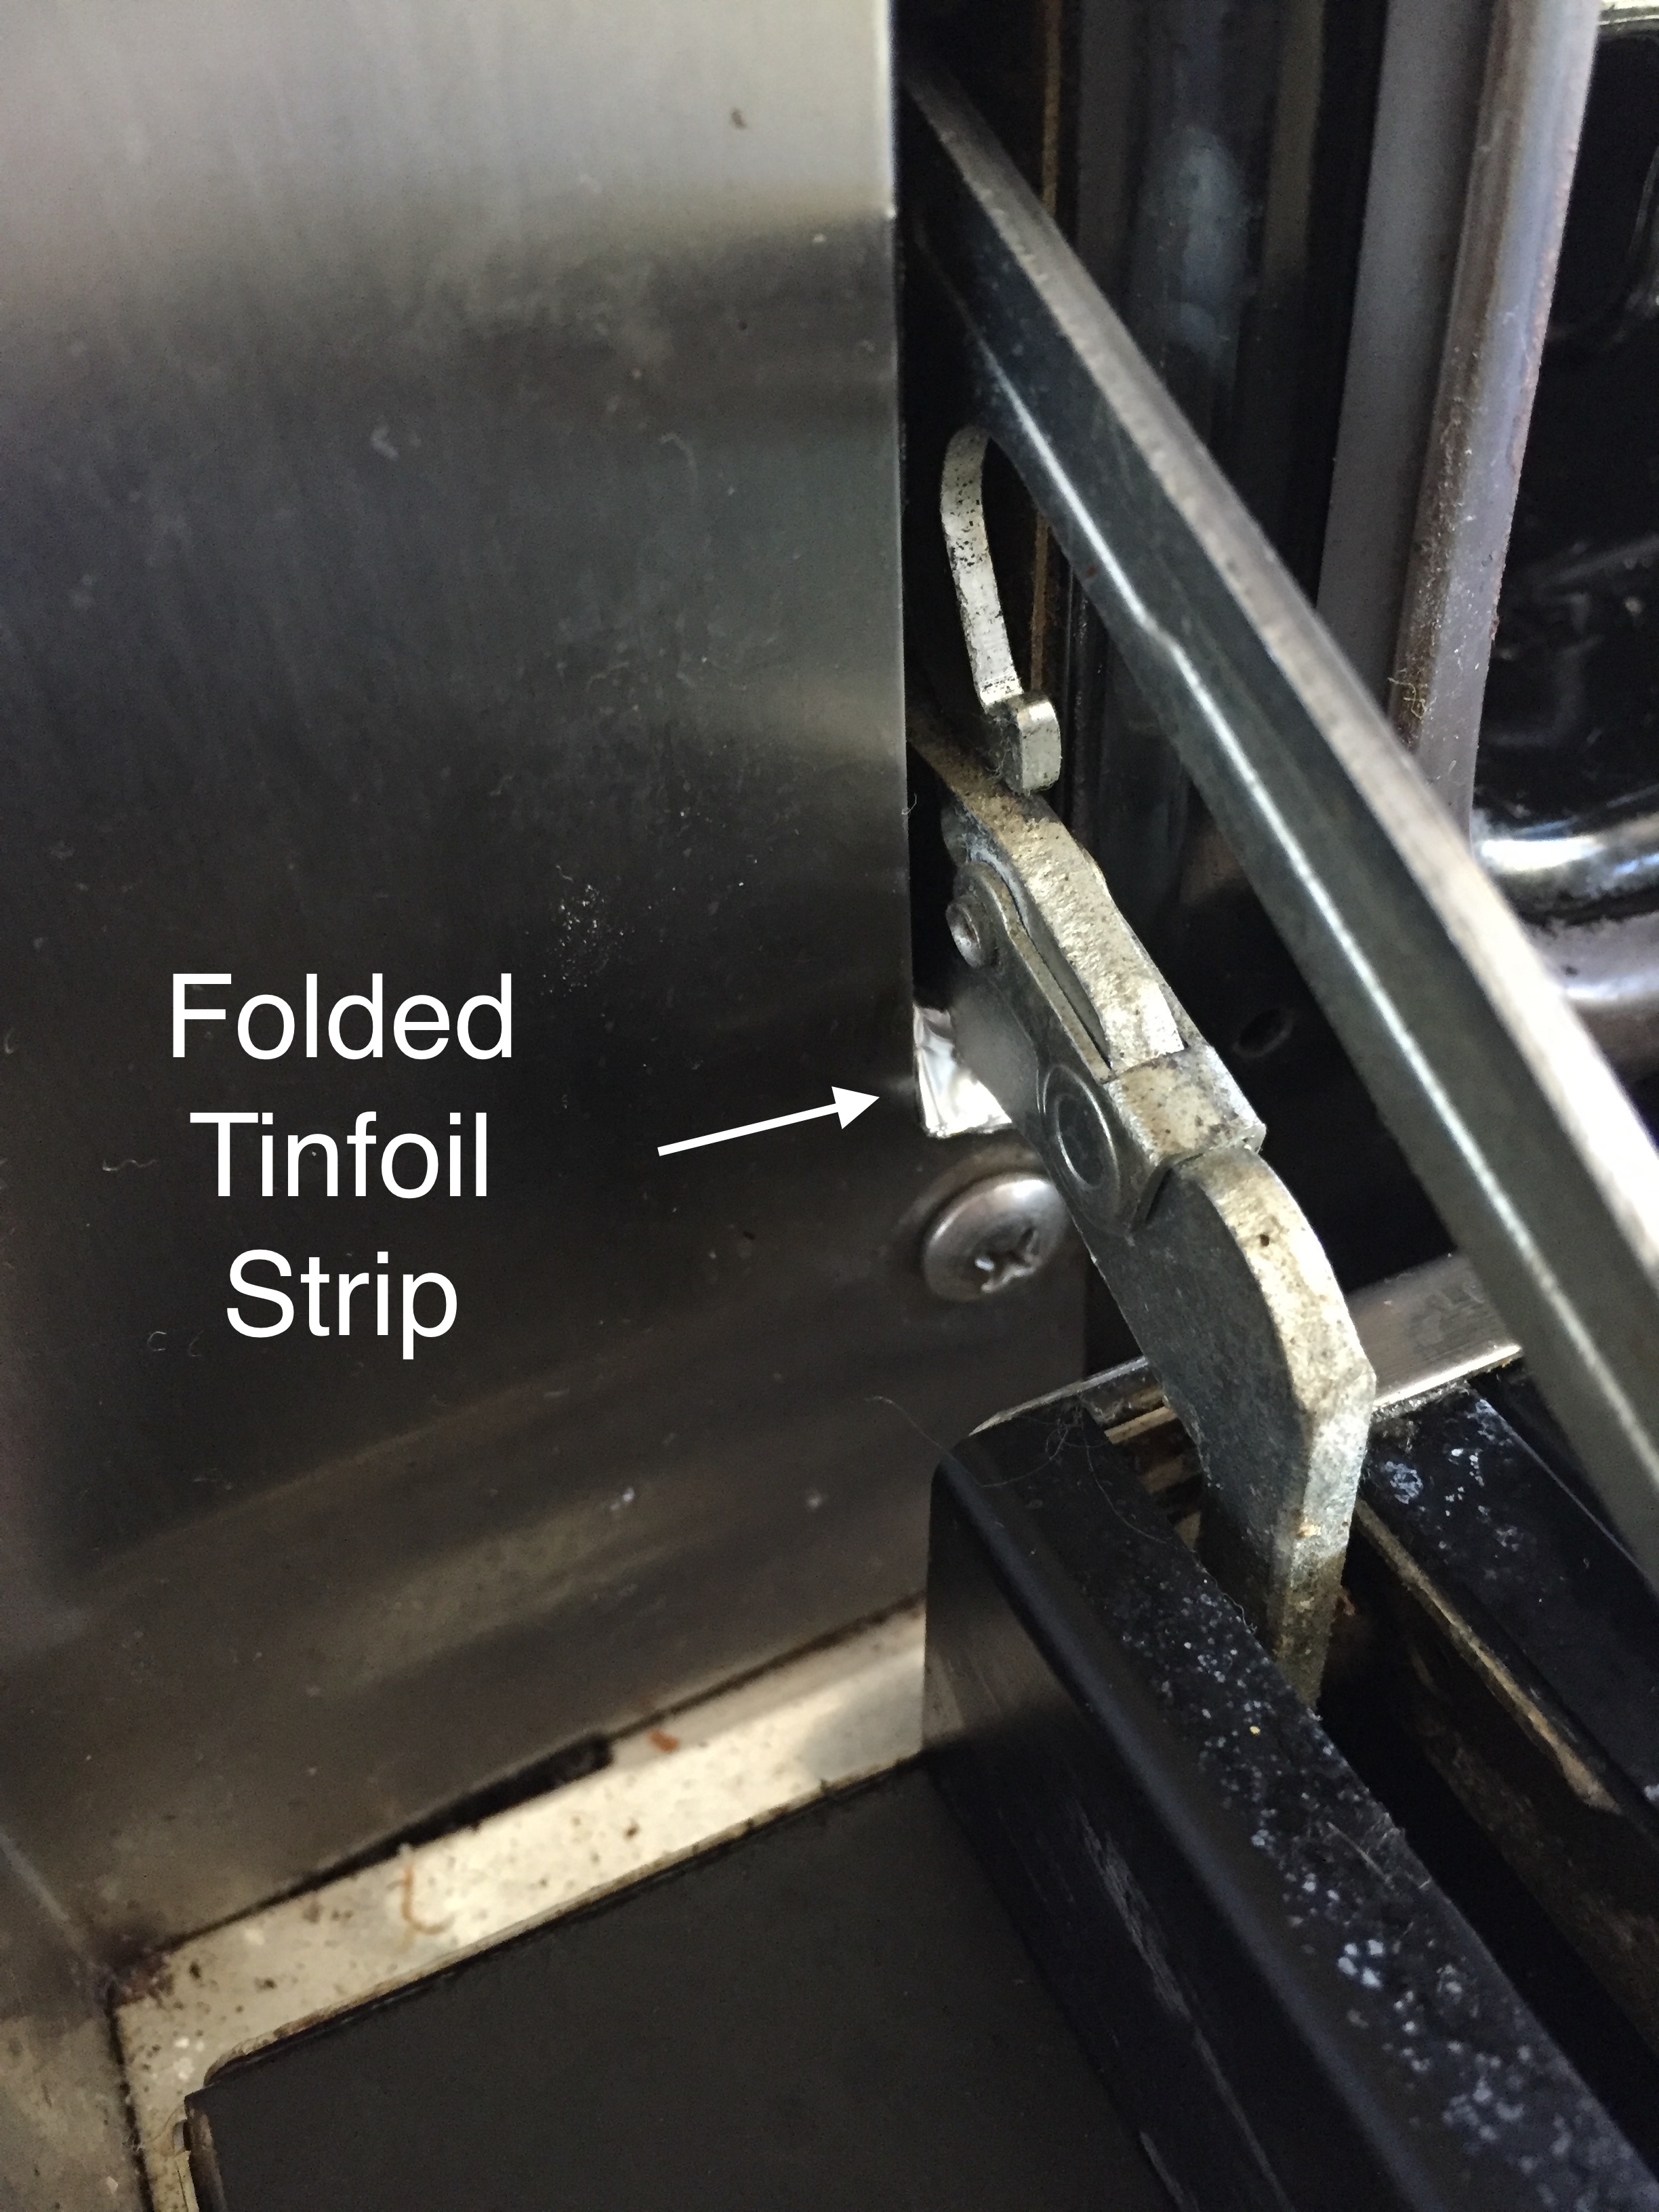
Now the difficult part/the inspiration for this post: The final step is placing a steel bracket and a pretty covering plate in front of the front feet of the dryer to make sure the dryer doesn’t move when in use. For this you are supplied with four (the manual says 2 and you only need 2) M4x16 screws. This is a pointy self tapping screw with a decently coarse thread. As you start screwing this in by hand, you will feel how the screw bites into the sheet metal within the frame and then the tip comes up against solid plastic. Driving this by hand, the resistance was much greater than I would expect and I was concerned I was going to split/break something – either the plastic at the back or strip the thread on the screw. Given the poor manufacturing on the bracket slot hole as seen earlier, I figured the pilot hole was possibly too small and possibly, the plastic was made to be self tapped into – hence the screw choice. I still had the feeling something was going to break. If I break it, there would be no recourse, and so contacted Samsung customer care. On a Sunday they have the 24/7 chat option only. After signing in they took 14 min to reply to get started. While courteous, the agent was not very helpful. First the obligatory check for compatibility of all the parts and then when said agent couldn’t find the manual (its right there on their website!) I knew this wasn’t going to end well. After offering me a voucher to try out another Samsung product (!!)it was suggested I call back the next day on a Monday on the provided the phone numbers. Which I did. Another courteous agent, wait for compatibility checking including serial numbers this time, escalation within department. waiting. Solution: will text me 2 local Samsung accredited repair businesses for a solution. Closest business, 50km away, flat out says – they don’t do stacking kits. End of conversation. Other business 100km away says all technicians are busy- hopefully I can talk to one the next day. This lady wanted to help but I could see she was (appropriately) shielding her technicians from Samsung callers from which they were probably getting no real business from and and lots of hassle. All I needed was 5 min on the phone with someone who has installed these kits before. They would tell me that what looked pretty iffy was indeed ok. This is advice you are more likely to get from a local reseller/installer than from Samsung directly, and why I would suggest you buy the products locally.

Now at my wits end, I chose the appropriate screw driver bit, pushed hard and drove that screw in with a power driver. Just make sure you don’t go too far and strip the thread.

All done. Learnt a few things you may find helpful. Comment if you did.

Hardwired smoke alarm with battery backup keeps beeping after battery replacement(Clipsal LifeSaver 755)

You have replaced the battery for your hard wired smoke alarm, yet it keeps beeping. This happens if the battery gave low battery warning beeps prior to replacing the battery or even with scheduled replacement.

You have searched online for the manual but can’t find it. If you did, you realise this  scenario is not covered.

It appears the solution lies in cancelling a persistent low battery status. Most devices are power cycled when a battery, its only power source is removed and replaced, not so for a device still connected to the mains power.

So to enact this solution you will need access to the switch for the circuit on which your smoke alarm lies in the distribution box.

Steps in the following order worked for me.

Battery out
Main Power switch off
It will still keep beeping (must be a capacitor in the power train). Wait till it feebly beeps till it dies.
Wait a little longer- about 5 minutes.
Replace battery – will beep on lid going into place.
Turn on mains power
Give a good vacuum of the device while there, if you can.

If this doesn’t work, and you’ve tried many other attempts to solve it, it is important to keep in mind that:

1)If you have this specific model its approaching end of life and probably needs replacing anyway (10 years)

2)It may still be an ionisation type detector (usually has a radiation warning symbol on it) which is not the preferred type. Photoelectric detectors are preferred – another good reason to replace it.

Hope this works for you – let me know in the comments if it did.

FIX: Smeg oven door does not close properly. Slightly ajar when closed.

Unfortunately I cannot claim credit for this really simple and easily performed fix.

I found it on an old forum thread. (Original forum thread on How to Mend It: http://www.howtomendit.com/answers.php?id=199139)

All the links to the explanatory pictures posted over the years no longer work.

From reading the descriptions I pieced it together. Not that that was too difficult, but there is no standard way to explain oven door hinges!

The reason the problem comes about is because either the springs tension in the hinges to keep it closed are no longer good enough , or the lip (this lip will become more apparently shortly) on which the arms of the hinge that extend into the oven rests, wears down with use.

While what I am about to describe works on Smeg oven doors, this fix apparently works for other brands of doors (such as Ilve) which have a similar mechanism.

Firstly remove the door.

1)Open fully. All the way down! Undo small levers (catches) between the arms on both sides. If they will not unhook, gently push down on the door a bit and see if that helps.

2)Half close door (45 degrees) and pull the door out.

This youtube video explains door removal as part of hinge replacement.

And the problem he has with the door at the beginning of the video (0:08) is the one this will fix.

The fix entails using tinfoil. I used standard thickness baking tinfoil. Nothing special.

Tear off  strip about 4 cm (you will probably need less) The roll I used was about 20 cm across, so a 20cm x 4cm strip.

Fold the foil in half repeatedly until its about 6-8 layers thick.

Cut this into two strips about a centimeter long and just wide enough to fit into the width of the opening into which the hinge arms of the door go on the oven.

Fold in half and place over the metal lip at the lower end of the opening on the oven. Press it down snugly with a tool so that it seats well and will not be easily dislodged.

Repeat for the other side.

Replace the door. The little notch on the lower arm of the hinge on the door (2:46 in the video)  fits/rests over the metal lip in the oven opening.

The idea is that there will now be multiple layers of tinfoil between the notch and the lip like this.

Don’t forget to close the levers (“catches” in the video). If the little levers won’t engage fully into the locked position, make sure the door is fully open (3:10 in the vid). I had this issue.

If this fix doesn’t work because your hinges are truly broken and not just slowly failing, it appears that replacing them is not too difficult if you have the spare parts. I might need to do this in the future.

Good luck!

Lion/Mountain Lion: Can’t see our NAS? Using VPN client software?

You may need to uninstall the VPN client. Luckily I no longer needed it.
And if you uninstall, its best to use the uninstaller that came with the client.

I hade Checkpoint / Securepoint installed. I could not see the NAS via its setup client.
This did my head in until I saw a post about someone who found his VPN client interfering. Removed mine. No luck. Realised there were Launchagents still doing things in the background via error logs.
Used the uninstaller that came with the checkpoint/securepoint and now it works just fine. Hope this helps someone out there. This may problem may reveal itself as a timemachine backup that wont work after installing the VPN client. I bet the timemachine target is on a NAS!

Attention span : just one of many attributes that technology has modified

Over the last year, while studying, I noticed there is a marked difference in my ability to concentrate for long periods, without distraction, on study material. When at university,  I can recall completing sessions in excess 90 minutes quite easily. These days I struggle to hit two pomodoro successively without a distraction. And major ones at that.

I have surmised that modern technology and the internet has a part to play. After all, at university I didn’t have a internet connected device in my pocket. I had to walk over to the the computer lab. (We were so jealous of the computer science “nerds” who had connections in their residence rooms.)  In the last few months I have come across a few articles where this was mentioned in passing. Today, purely by chance I happened to see an interview with William Powers at the recent  Melbourne Writer’s festival. And he just made sense. He has authored “Hamlet’s Blackberry” in which he describes the role of technology and how it has changed us. And one item he did mention, was this new inability to maintain a sufficient attention span.

As further food for thought he showed this advertisement from a major Thai telecommunications company. It speaks for itself.

He also related a type of technology sabbath , that he and his family has practiced for 4 years already, whereby the family turns off their modem for the weekend on a Friday evening. I wonder how I would cope 😉

The original interview is no longer online but a transcript of a shorter interview:  “Are we becoming slaves to machines?”

Downgrade/Restore your Mac to Snow Leopard after upgrading to Os X Lion

My ageing macbook didn’t quite like the upgrade to Lion. Addittionally, the fact that rosetta is no longer supported is rather crucial when you have a specific piece of hardware that uses custom PowerPc software to run. Yes it may be old but, in my case, that would require replacement of a specific niche bit of hardware.

As long as you have a Snow leopard boot DVD and a time machine backup of your mac pre Lion installation, its actually quite easy.

On would assume you made a time machine backup just before upgrading to Lion?

Place the boot disc into the drive, restart and Press “C” during bootup to get the DVD to be the boot drive. Afterbooting up, before confirming a clean SL install it will prompt you for a restore from a time machine backup. Follow the instructions by reaching for the utilities tab in the menu’s.

After ensuring the time machine drive is connected you will be offered multiple restoration points. Luckily the version number of the OS is indicated. So choosing the last 10.6 version would have you selecting a snow leopard restore.

A few clicks further and a serious bit of a wait, and its all done.

She’s running much smoother again and I have my legacy apps.

Citing references: Mendeley plugin for LibreOffice.

With the Mendeley desktop installed you will find that an attempt to install the citation plugin for OpenOffice on your copy of LibreOffice will fail through the usual route of Tools>Install OpenOffice plugin. The prompted “manual” install alternative does not work either.

The way to get this to work in LibreOffice is to open the appropriate Mendeley supplied *.oxt (plugin file) with Libreoffice.

On Mac this would be right click Mendeley Desktop in Applications>Show package contents>Contents>Resources>OpenOfficePlugin> Mendeley*.oxt file. Right click>open with>LibreOffice.

Basically its a manual install of the plugin .oxt file by LibreOffice. Too easy.

Thanks to tkeitt ‘s post on http://feedback.mendeley.com/forums/4941-mendeley-feedback/suggestions/1226271-plugin-for-libre-office

FB security *yawn* – Firesheep *hmmm sounds interesting* – and the opt in option for https on Facebook *yawn*

Me doing a security type post, here’s a first…Some of you will repost this, others won’t. No scaremongering here. Realistically, not enabling https access may not affect you at all, but if you use an unencrypted wi-fi access for FB, then you definitely should be. (Does anyone still have a non WPA2 encrypted home wi-fi network? I so so hope not!)

I am not going to get technical. Lets just say that gmail implemented it as default a few months back. I remember Charl B pointing out this issue with regards to gmail nearly 16 months ago and the opt in solution . Then they made it default a few months later.  Most gmail users probably never even noticed the change. It made no difference to the performance.

On facebook its still opt in however, not default, a year later!

https is the encrypted protocol that banks use for communication when you do your banking. You know, “the lock” at the bottom of your browser?
Firesheep is an add-on that runs in firefox that allows someone on the same unencrypted wi-fi network as you to basically log in as you to sites that don’t use https for the whole session. Before this, “sidejacking” was a bit more difficult.

Aston Kutcher, while at TED (TED is awesomeness!) must have used unencrypted wi-fi without https on his twitter and got firesheeped.
more background here:
Someone in DC cares about online security

It makes sense to turn it on. If it gives you hassles, turn it off. If you use unencrypted wifi bear with it!

in FB goto
Account>account settings>Account security and click Secure browsing (https)
Simple!

Facebook and Firefox: Buttons not showing up?

If you use firefox and facebook, you may notice (or may not actually) that the navigation buttons and added functionality options by way of “buttons” dont show up. These are the Nav buttons next to the facebook logo for Friend requests, messages and notifications. Then the button for settings on posts on your wall and even the forward and back buttons for the photos.

To get these back, while you have  facebook up, just

1. Right click screen
2. go to “view page info”
3. select “media” tab
4. uncheck “block images from static.ak.fbcdn.net”

(Source: A helpful post in the FB forums from M.Delhie)

Inadvertent track pad input while typing? (Mac)

A mouse is connected and I am not using the built in track pad on my macbook. Occasionally while typing I inadvertently touch the trackpad, the cursor moves to some random spot in my typing without me noticing and the new input is somewhere between everything else.

Going to the Trackpad tab in System Preferences has the Ignore accidental trackpad input box checked, but makes no difference for me.

The answer is to go to Mouse and track pad under Universal Access in System preferences. Click Ignore built in track pad when mouse is present.

It would be better if the previous solution actually worked as advertised (am I missing something here?) But this solution is the best I have found.

Sorted!